Using Velociraptor for DFIR
Threat Hunting & Investigation
Practical
DFIR
Jan 31, 2026

Using Velociraptor for DFIR
In this blog post, we’ll cover an overview of Velociraptor, a powerful cybersecurity tool, and focus specifically on how it can be used in DFIR. We will introduce the tool, talk about its benefits, and briefly cover deployment. Additionally, the majority of the blog post will be a comprehensive demonstration of how to use certain Velcoraptor features. It is our hope that this blog post will help introduce you to the tool, get you started with using the tool, and possibly convince you to implement it yourself.
The main website can be found here: https://docs.velociraptor.app/
Velociraptor is currently owned by Rapid7. The company has integrated Velociraptor into its own product-line, but the tool remains completely free and open-source. The website for the Rapid7 Velociraptor product page can be found here: https://www.rapid7.com/products/velociraptor/
Now let’s learn about this powerful DFIR tool!
What is Velociraptor?
Velociraptor is a free and open source endpoint monitoring and incident response tool which was created by many individuals in the Digital Forensics and Incident Response community. The software is similar to an endpoint detection and response tool (EDR), but it has capabilities which take the tool even further.
The tool is designed to hunt threats, monitor activities, and collect forensic artifacts across a large number of endpoints. A single Velociraptor server is capable of handling monitoring between 10,000 and 15,000 endpoints. For anything larger, Velociraptor can be configured with a multi-frontend architecture up to over 100,000 endpoints.
Velociraptor provides the ability to more effectively respond to a range of incidents through customizable artifact queries. This is done by using the Velociraptor Query Language (VQL) to collect and monitor almost any artifact of any endpoint, endpoints, or the entire network.
Queries can be very specific and targeted at artifacts of interest. For example, instead of creating a forensic image of a system and extracting the SAM registry hive using a tool like FTK Imager, you can pull the SAM hive in one query using Velociraptor, with no imaging needed.
Queries can also be refined even further to reduce the amount of processing time needed by Velociraptor. For example, timestamps can be used on Velociraptor’s UI in order to only pull artifacts within the specified range of time.
With these features, and more, Velociraptor is best utilized when an examiner knows exactly what artifacts they want to collect and why they want to examine it. The use of specific and targeted queries will speed up the incident response greatly.
We will explore two main features of Velociraptor in this blog. Network wide artifact collections, called Hunts, and endpoint specific artifact acquisition through the Virtual Filesystem and Collections features.
Deployment
In this blog post we will briefly cover the deployment of Velociraptor. This will only be to get an overview of how the tool functions and operates in a network. For the purposes of this blog and from a DFIR perspective, knowing the intricacies of deploying Velociraptor is not in scope. Furthermore, the Velociraptor documentation for deployment is excellent. If you’d like to follow their documentation, it can be found here: https://docs.velociraptor.app/docs/deployment/.
Pictured below is a simple overview of how Velociraptor is deployed on a network. There are three main pieces important for us to understand, in the picture these are labeled Velociraptor Server, Admin, and Assets.
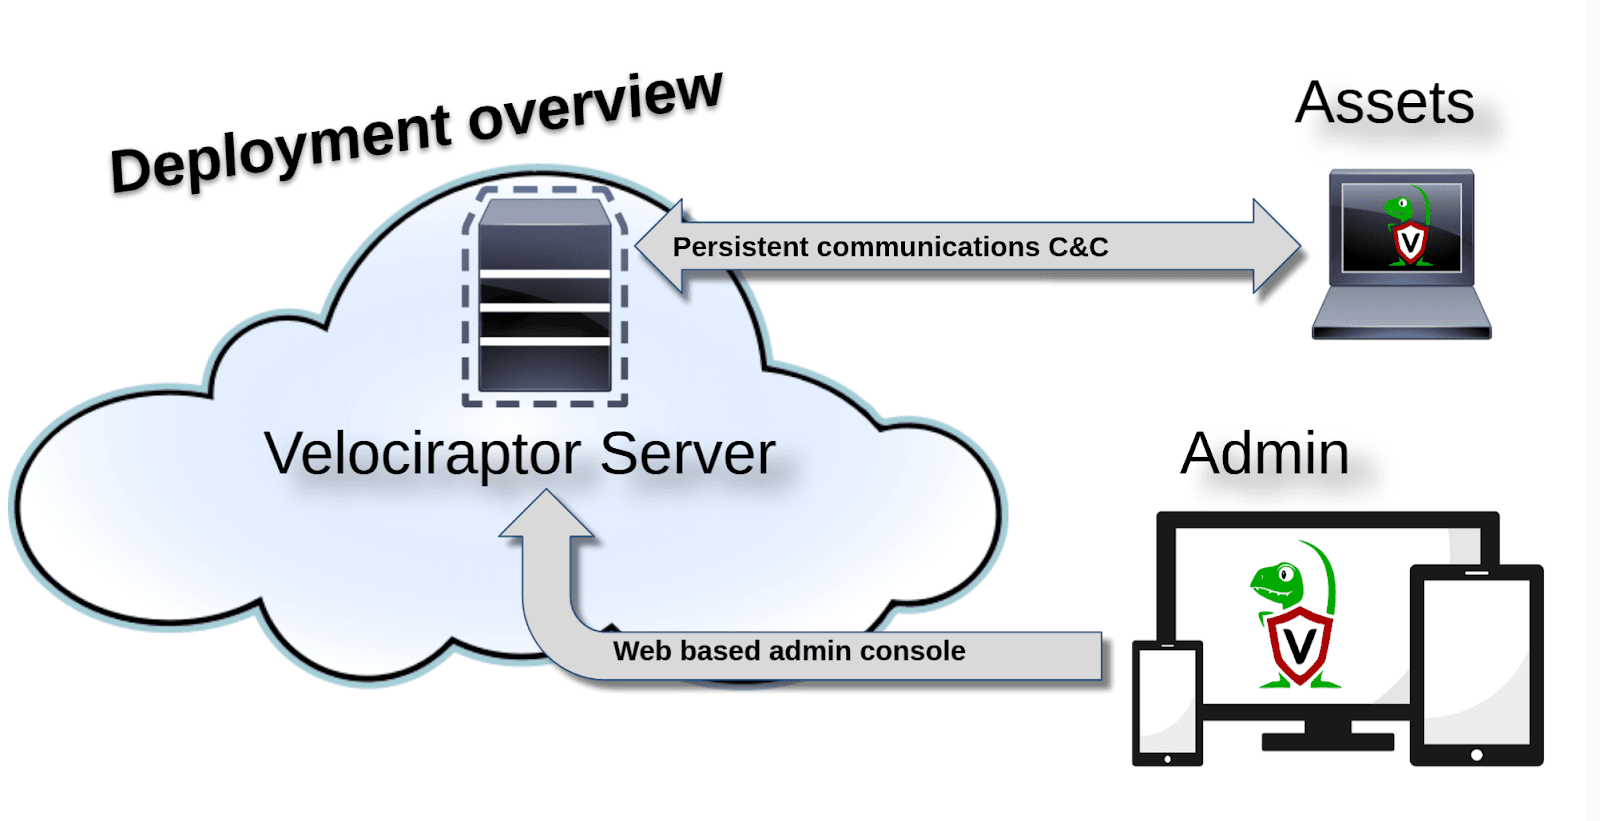
“A typical Velociraptor deployment” from https://docs.velociraptor.app/docs/deployment/
The Velociraptor server is typically deployed on a Cloud VM Linux machine. This device serves as the driver behind Velocirapotors functionality. The Velociraptor server hosts the Web UI, or Admin Console. This Web UI is how Velociraptor’s features can be accessed by the DFIR professional. The Velociraptor Clients, or Assets, are the endpoints which are monitored by the Velociraptor server.
For the purposes of this blog post, this is as deep as we’ll go into the deployment of Velociraptor. As previously stated, if you are looking to use Velociraptor for yourself, please reference the Velociraptor deployment documentation, which is excellent.
How to Use Velociraptor
When you first login to Velociraptor, the GUI will appear as pictured below. There is a menu on the left side with many options and a search bar at the top which we will explore.

In this blog post, we are specifically going to focus on Hunts, Collections, and the Virtual Filesystem. These three features are different methods of collecting forensic artifacts using Velociraptor. Learning and mastering these powerful features will enable you to use Velociraptor very effectively
Hunts
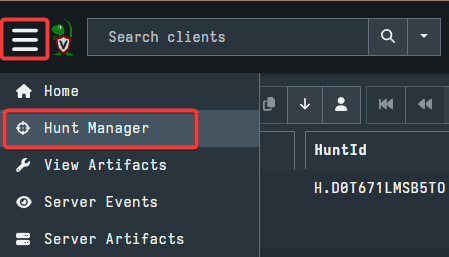
The hunt feature is for network wide collections, meaning every endpoint of the network. Using the left side menu, select the Hunt Manager option. This is where we will configure our network wide forensic artifact collections.
Now, select the + button to create a New Hunt. This will open a new GUI with many options to explore.

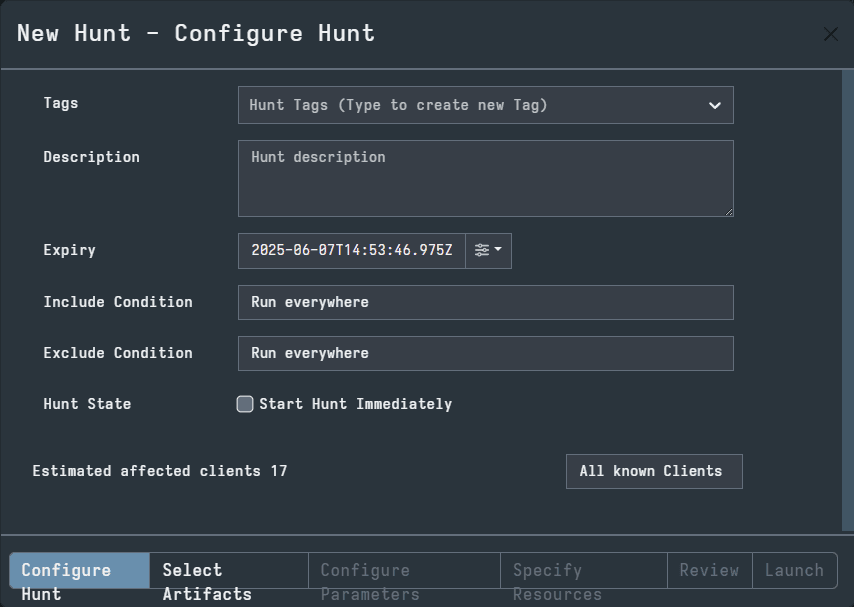
The first tab in the GUI is Configure Hunt. Here you can add Tags to the hunt, provide a description, and specify conditions. These options are not necessary, but they may be useful for organizational purposes.
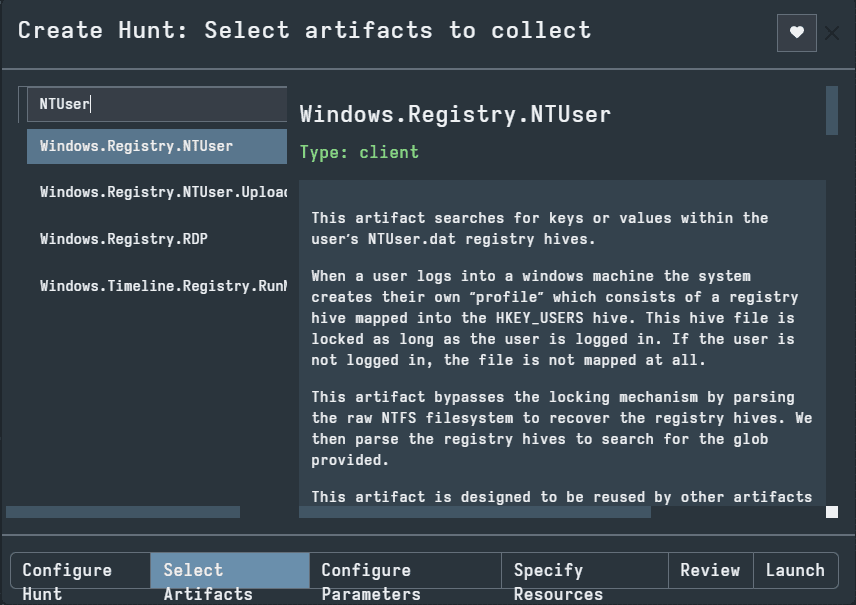
The next tab is Select Artifacts. Here you can use the search bar or the scroll wheel to select artifacts you wish to collect. For our example, I have searched “NTUser” and selected the top result. This opened the artifact description on the right side of the GUI. When you configure the hunt, you can select as many artifacts as you’d like.
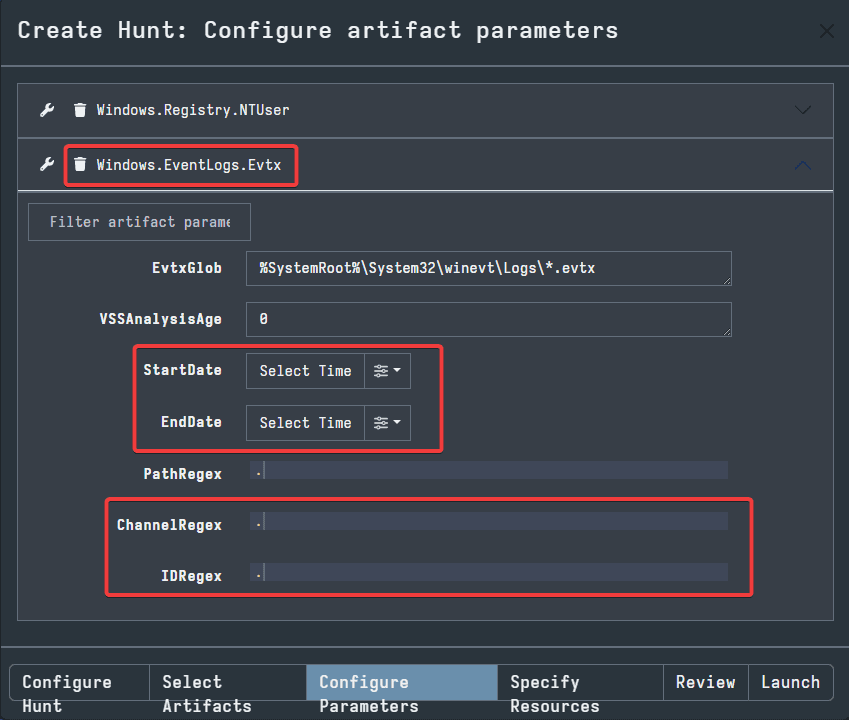
For our example, we also selected a Windows Event Log artifact in order to display some of the features of the next tab, Configure Parameters. Here, you can specify certain details which will narrow down the scope of the artifact collection.
In the example pictured below using Windows Event Logs, we can see there are several parameters to configure. There are timestamps as well as Channel and ID. These options are very useful in narrowing down the collection in order to limit the data you must search through. For example, if you are looking for all the logon Event Logs, we could specify the Security channel and ID 4624.
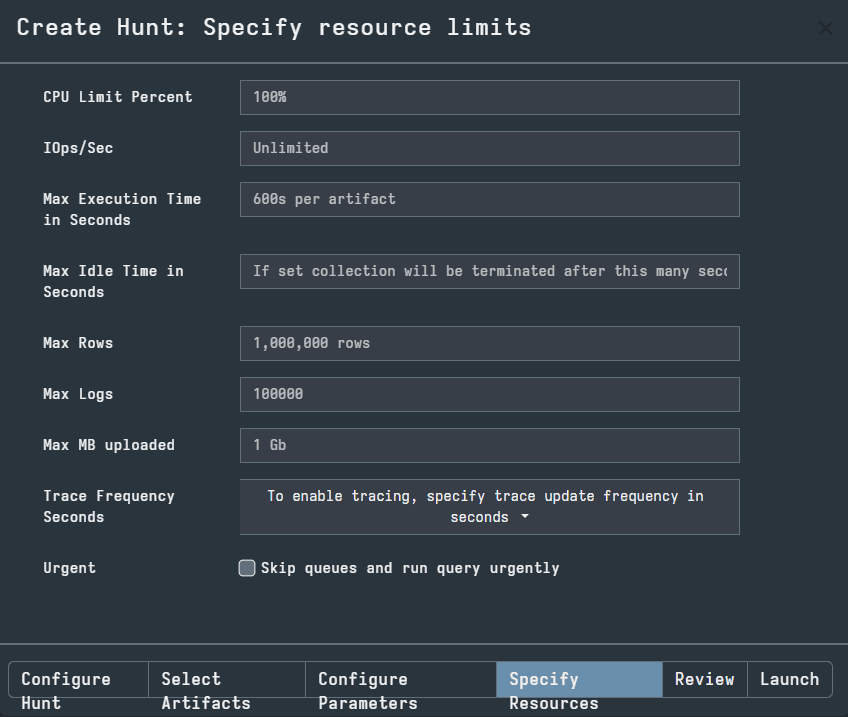
The next tab is Specify Resources. If you are using Velociraptor in your own personal environment in the future, it can be important to learn to use the options in this tab. If you have limited resources on the network, then you should configure the options here to allow for the quickest collection and best distribution of available resources.
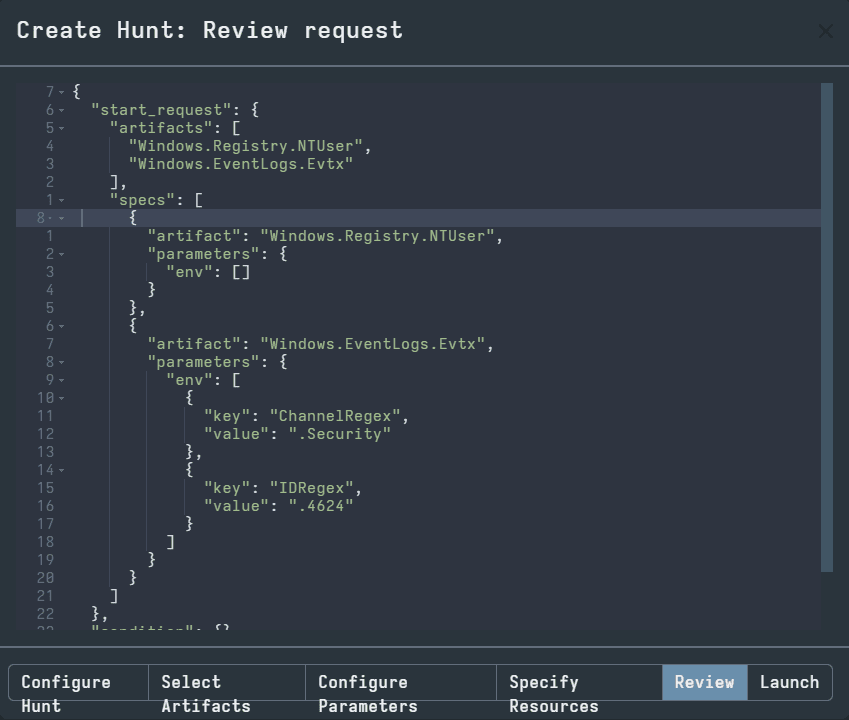
The next tab is Review. You can see the hunt you have created in VQL and review the hunt before launch.
When you are finished with the Review, select the Launch tab to begin the hunt. This will take you back to the Hunt Manager page. Now, you should see a hunt listed for you to click.
In the picture below, there are three hunts. I have selected the top result, which is the hunt we just walked through. This opens a tab from the bottom of the GUI, with the tabs Overview, Requests, Clients, and Notebook.
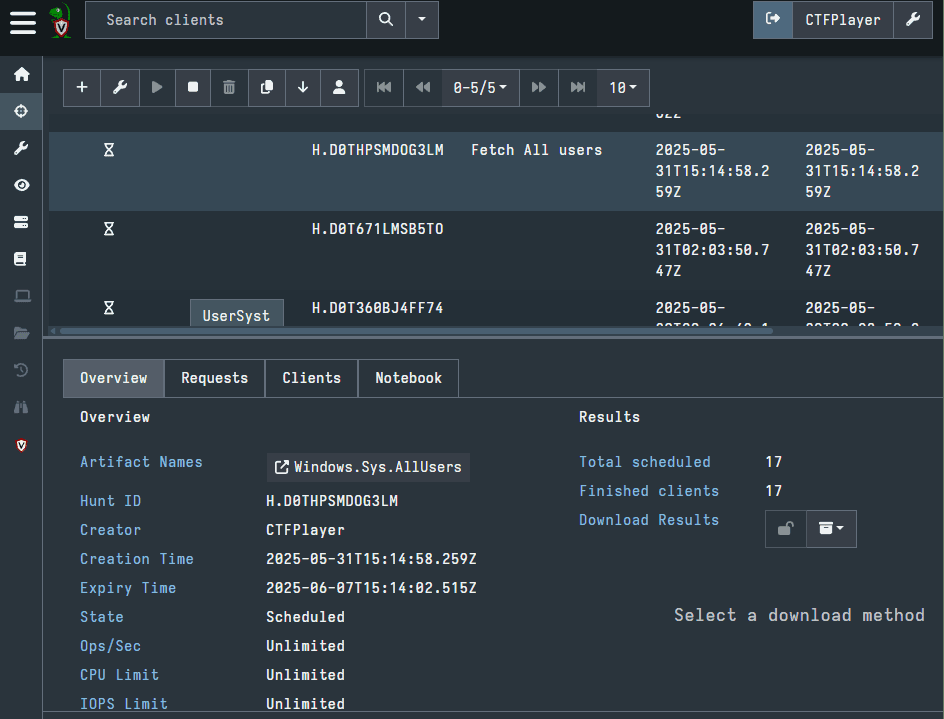
Pictured in the screenshot above is the Overview tab. This will show some of the metadata about the hunt, including the names of the artifacts, the time it was created, the clients being searched, and more. Importantly, there is an option to Download Results here. This is not necessary, as there is a way to view your results in the Velociraptor GUI. Although, if you have a preferred tool to examine results, like a CSV viewer such as Excel or Timeline Explorer, you may want to use this option.
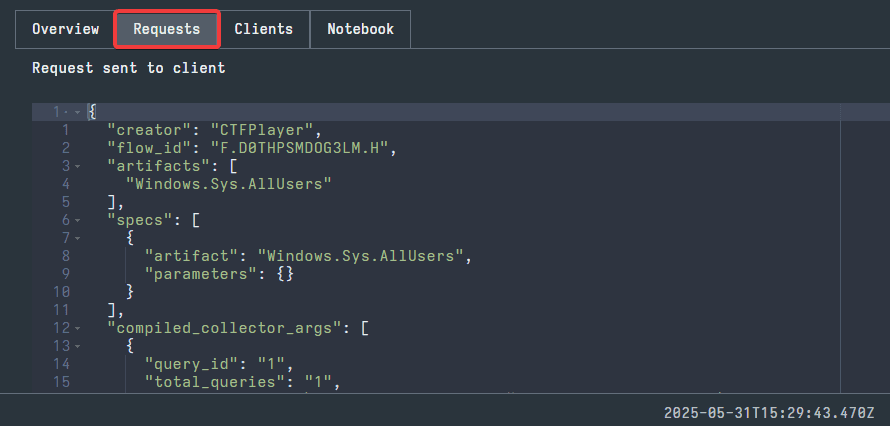
The next tab, Requests, will display the Hunt in VQL. This tab is similar to the Review tab from before.
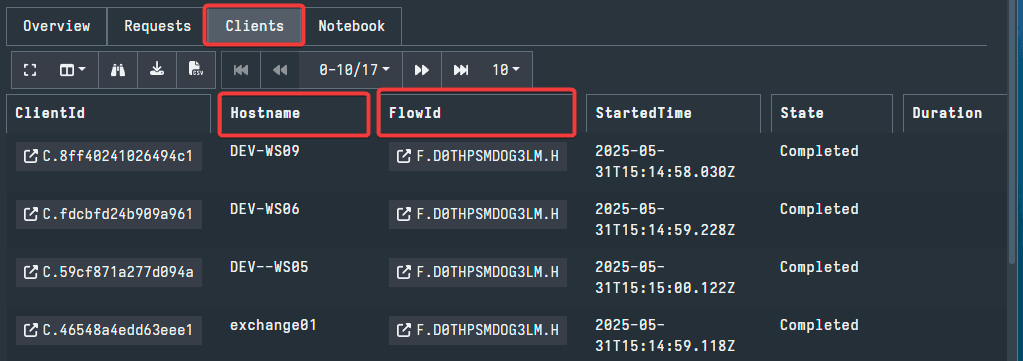
Next, the Clients tab will display information about the individual clients searched using the Hunt. Since the Hunt feature is only for network wide collections, this tab can break down the collection to the individual endpoints. Here, you can see the name of each host and the status of the artifact collection individualized. If you select the FlowId for a client, you can see the results for that individual client.
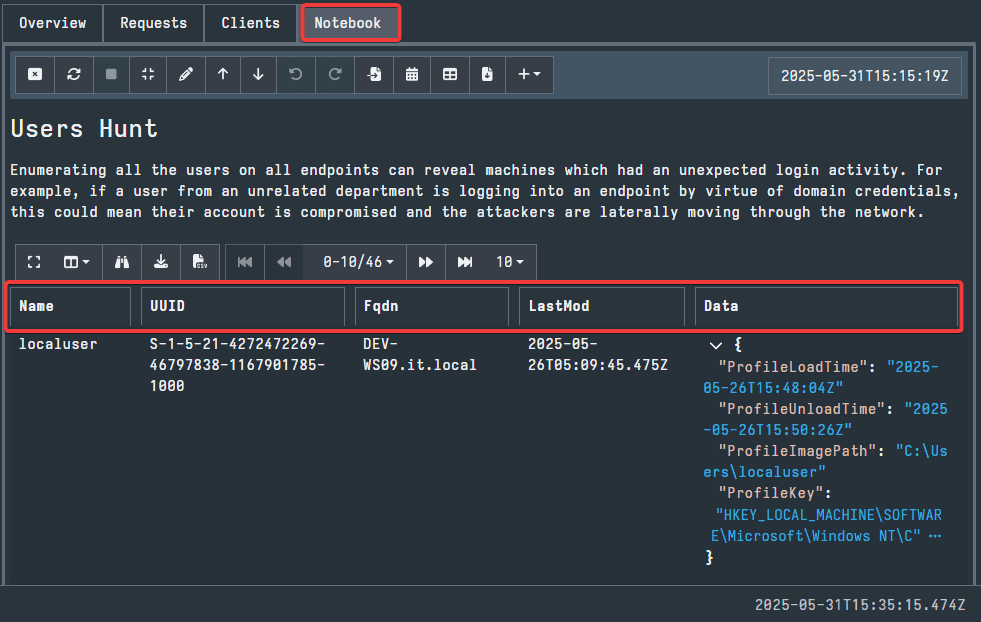
The final tab is Notebook. Here, you can view the results of the hunt. Depending on how specific the configuration parameters were, there could be many rows to examine here. There are sorting options for each column which can be used to make the searching more efficient. Additionally, you can still download the results and use your preferred CSV viewer to examine the results.
While the Hunt feature is useful in bulk data collection across the entire network, it is not always the preferred way to gather relevant data efficiently. The second method that we will examine, using the Collections feature to search clients individually, will be much faster and more targeted.
Hunts are an important element of Velociraptor and can be very useful in certain circumstances. If you would like to gather data from every endpoint, these will be more efficient.
Collections & The Virtual Filesystem (VFS)
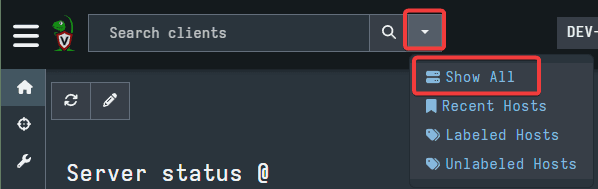
To access these two features, we first need to select an endpoint. First, select the drop down arrow next to the Search clients bar. Here, select Show All.
This will open a window showing all the endpoints in the network. Here, you can select the endpoint you wish to collect artifacts from by selecting the Client ID.
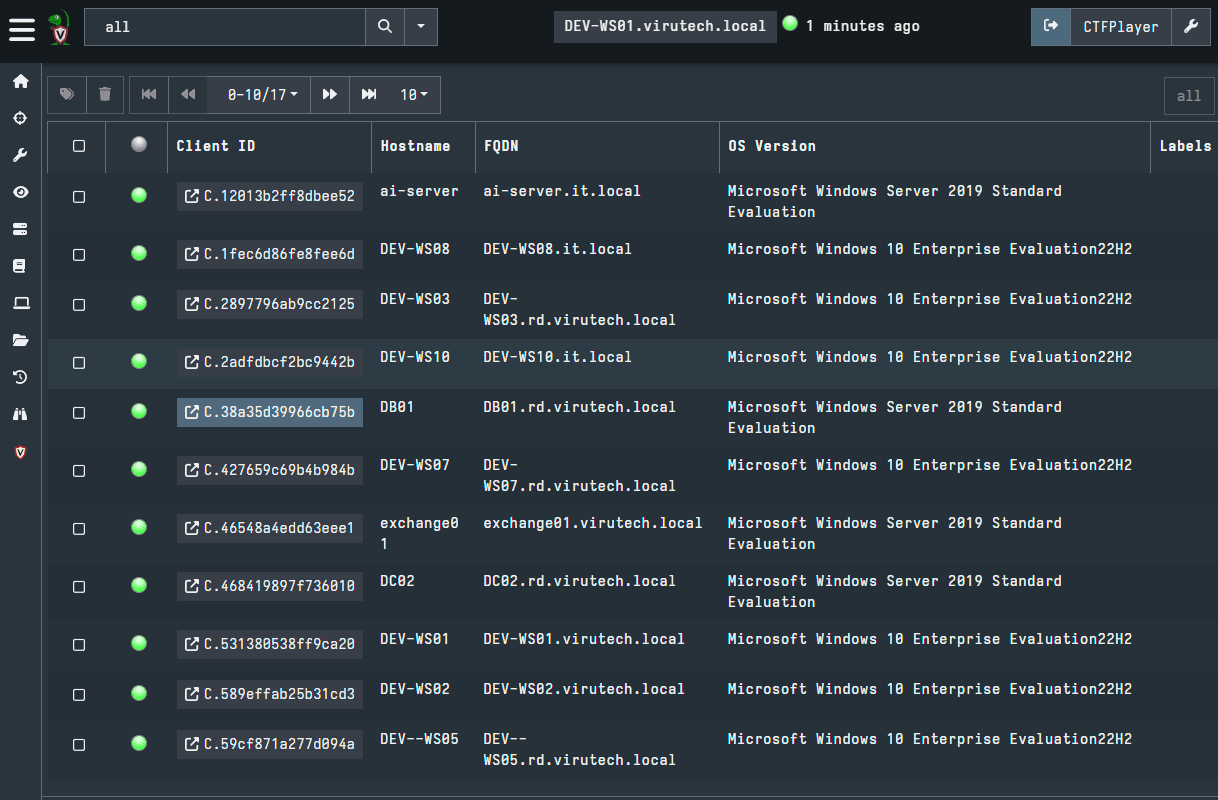
For our example, we are going to select DEV-WS02.
Selecting an endpoint will activate the four extra tabs in the left side menu and open the Host Information tab for the selected endpoint. The screenshot below shows the four new tabs in the left side menu and highlights the location where you will see the endpoint you have selected. The Host Information tab will display some basic data about the endpoint.
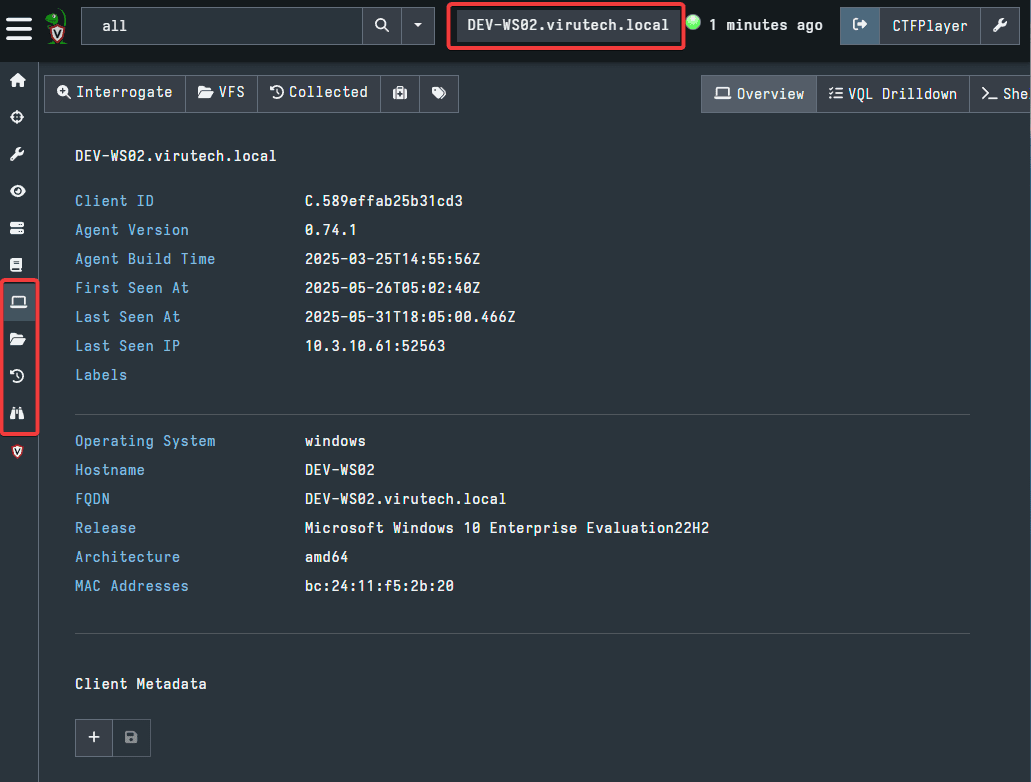
Next, you can access the Virtual Filesystem tab either by using the button on the left side menu or on the Host Information tab. Both are highlighted in the picture below.
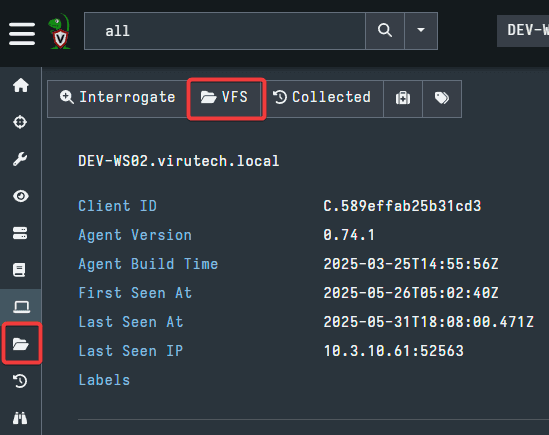
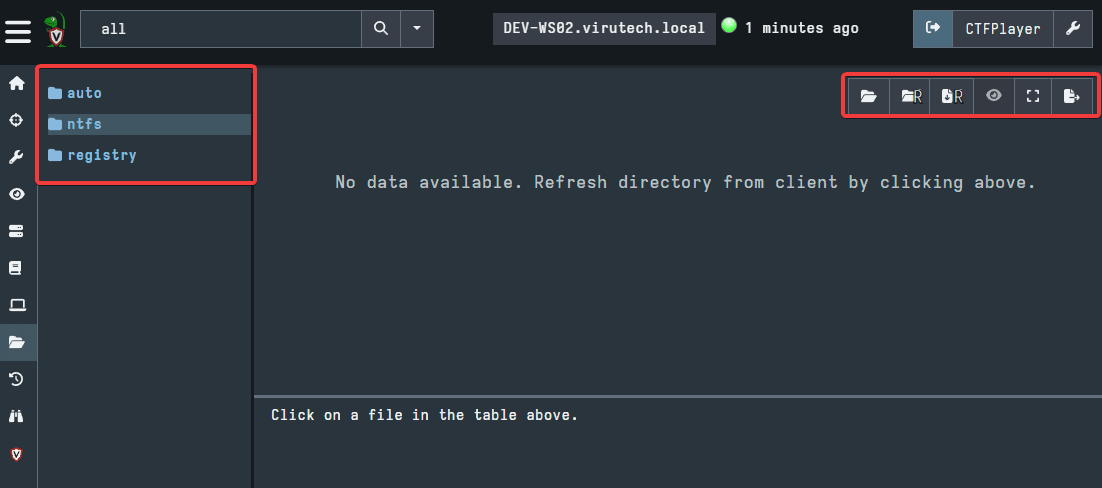
Pictured below is the Virtual Filesystem tab. On the left, you will see a UI file system. This represents the actual file system found on the endpoint. On the right is where the files themselves will appear when you have selected a directory. Also, on the right is a small menu. The options here are critical to examining the file system. At first, nothing will appear inside the directories when opened. You must use these options to pull the data from the endpoint. Hovering your cursor over each option will display what it does.
By clicking into ntfs, then using the first option, highlighted in the picture below, then clicking into the C drive and using the same option, we have pulled the file system data to examine the C drive.
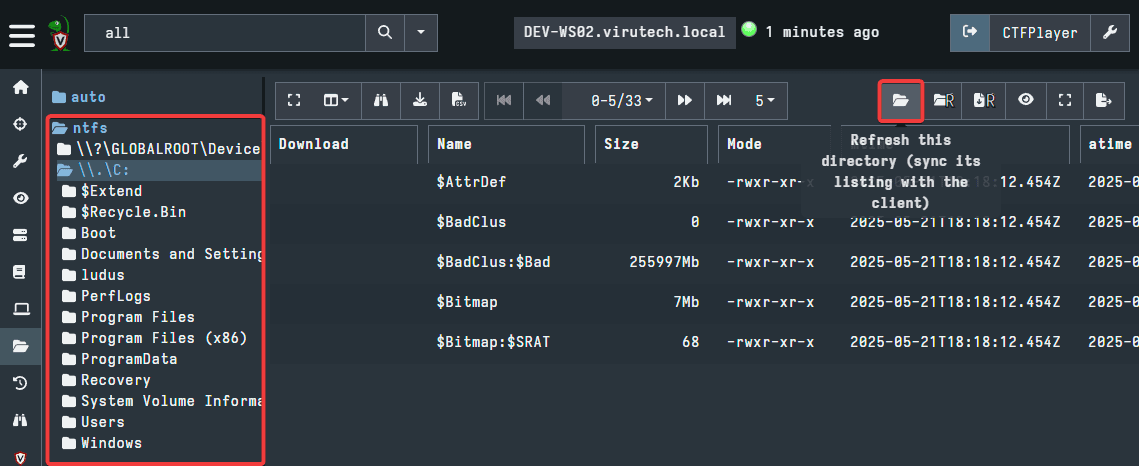
The option used will pull the file system data of only the directory you are in. Meaning, if we want to now look at Users, we will have to click on Users then use the option to pull the data for Users. The second option will recursively pull data, meaning, if you are on the C drive and use the recursive refresh, it will pull all the data in every directory and subdirectory and so on within the C drive.
The recursive refresh is useful, but it can take a long time to pull all the data if you are starting from a place such as the C drive. It is recommended to only use this option once you have made your way through some of the large directories.
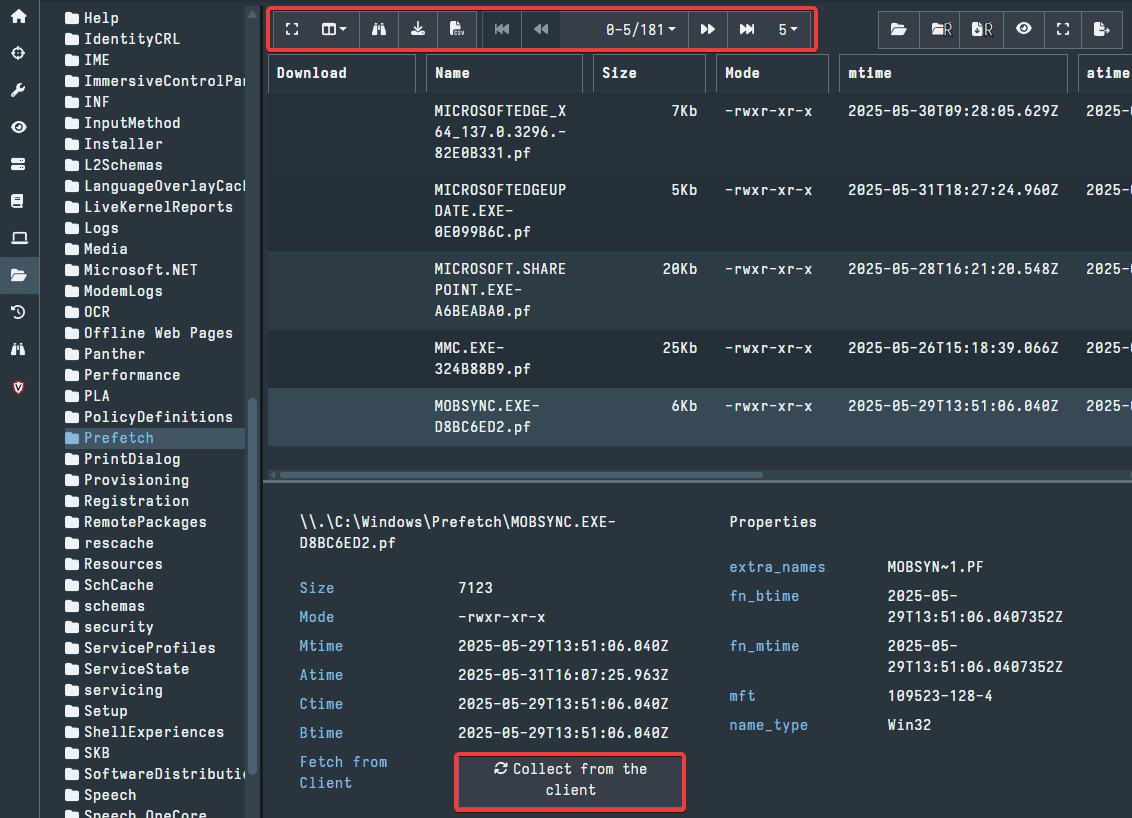
Using the Virtual Filesystem, you can navigate to and pull any Windows artifact you would like to examine. In the example below, we are looking at the Prefetch directory. Here, you can use the options at the top of the window to navigate through the files in the directory. To collect a file from the endpoint, you can use the button at the bottom of the screen.
Navigating the Virtual Filesystem can be a very efficient way to examine endpoints and collect artifacts of interest. It should be noted, there is also a Registry option in the Virtual Filesystem menu, in the screenshots above it is next to the ntfs option we examined. The Registry option can be used to collect specific registry artifacts using the same methods discussed for navigating the ntfs section of the Virtual Filesystem.
There is another way to collect artifacts from individual endpoints, known as Collections. Collections are very similar to Hunts. The main difference is that Collections are specific to a single endpoint.
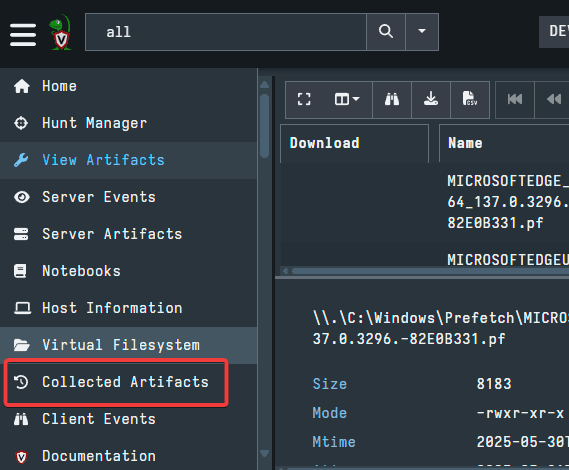
To start, select the Collected Artifacts option from the left side menu, just below Virtual Filesystem.
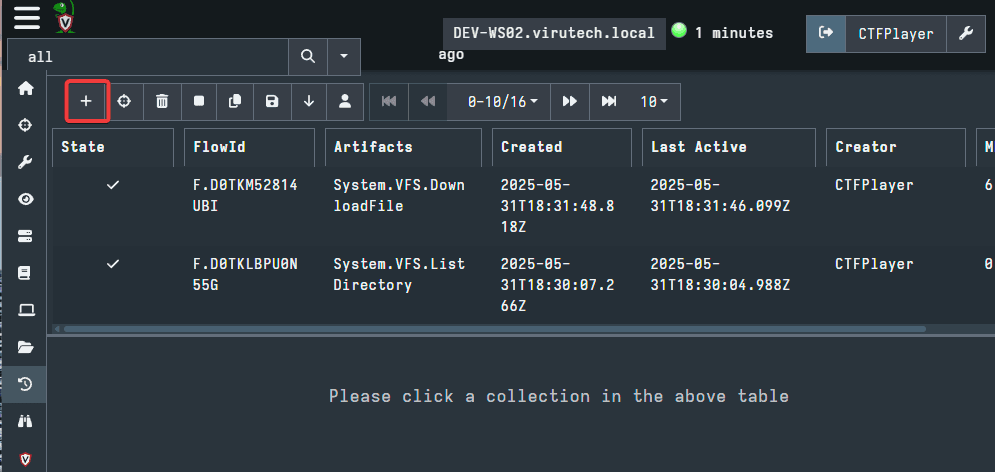
The Collected Artifacts UI will look very similar to the Hunt Manager. The two menus are essentially the same, with the only difference being that, as previously stated, Hunts are network wide and Collections are endpoint specific. Click the + sign to create a new Collection, highlighted in the picture below.
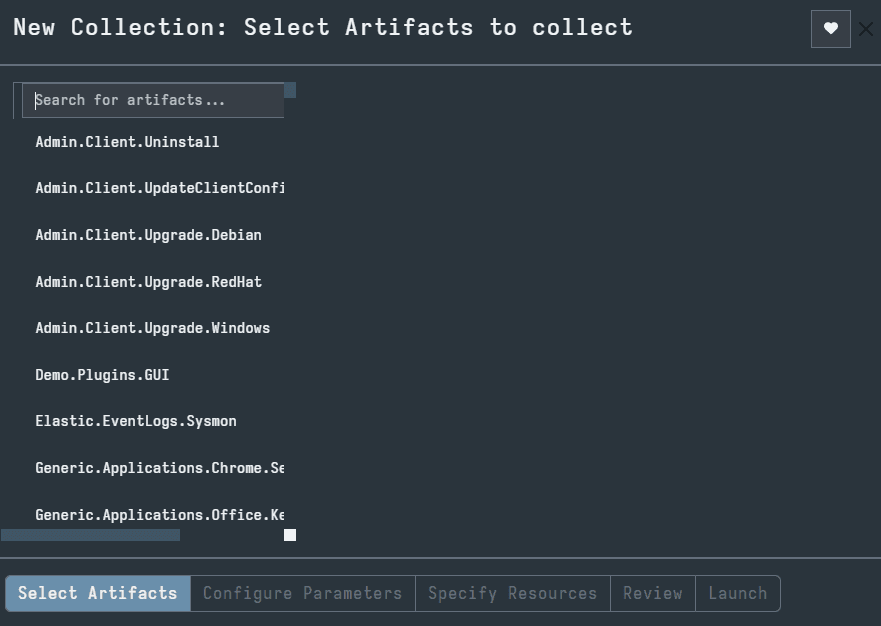
This will open a familiar window. The UI and options for creating a Collection are the same as for creating a Hunt. As pictured below, you can Select Artifacts, Configure Parameters, Specify Resources, Review, and Launch.
We will not walk through all of these options for creating a Collection. If you wish to review these options, then please refer to earlier in the blog when we explored creating a Hunt.
In the example pictured below, I created a basic Collection with only Windows.EventLogs.Evtx selected. Similar options to the ones we examined with the Hunts will be available. These are Artifact Collection, Upload Files, Requests, Results, Log, and Notebook.
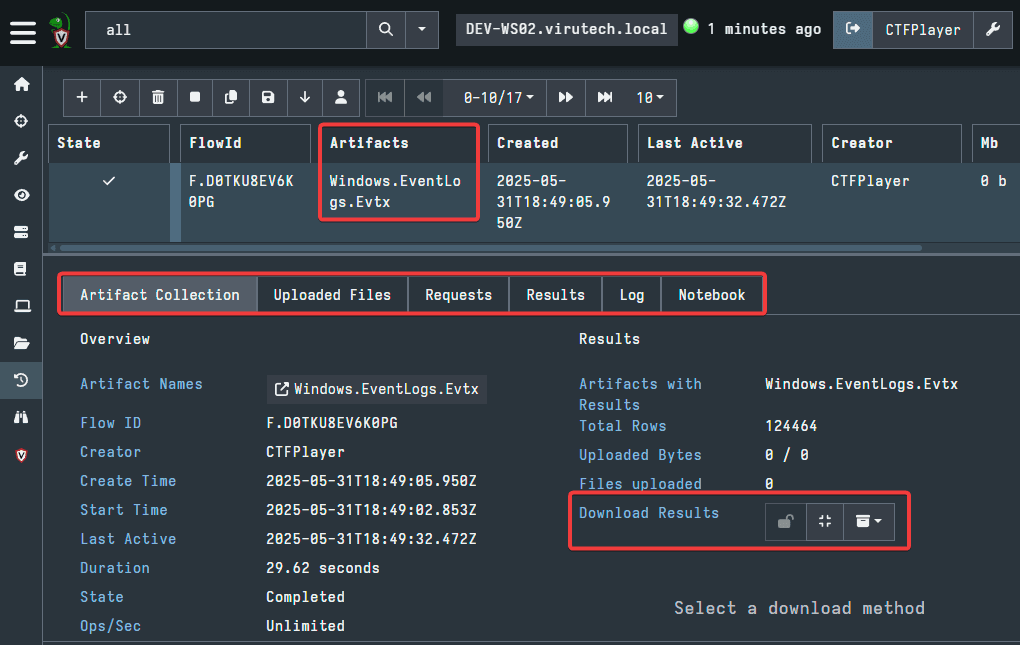
Just like with Hunts, Notebook can be used to examine the pulled files. Although, if you would like to view your results with a different tool, you can download the results, as pictured above.
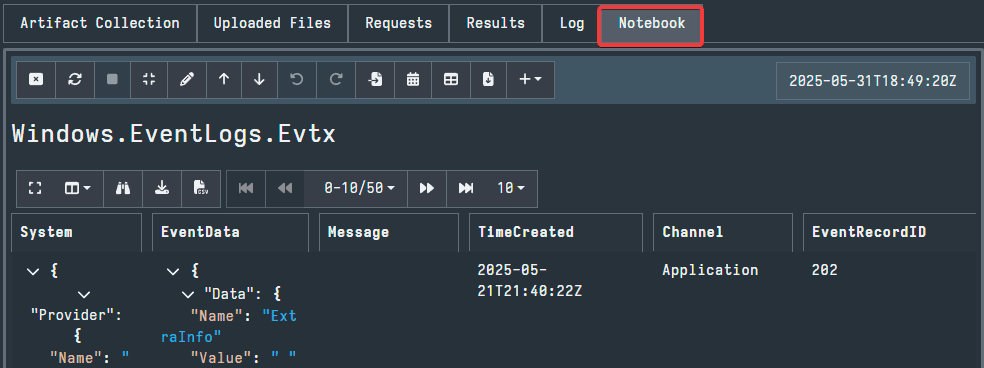
Pictured below, we can see the results of the example Collection which pulled the evtx files and we can use the UI to examine the files.
Conclusion
In this blog, we explored an overview of Velociraptor and three key features of the powerful DFIR tool: Hunts, Virtual Filesystem, and Collections. The best option to use will depend on the circumstances of what artifacts you would like to examine.
Using Hunts you can acquire the greatest amount of data in the smallest amount of time. Hunts can be configured to acquire specific forensic artifacts from every endpoint on the network. Parameters can also be specified which will narrow down the search to specific times and other artifact specific qualities.
Using Collections you can essentially perform the same acquisition of forensic artifacts at the endpoint level. You can select from the same artifacts and configure similar parameters but the collection will only pull from the endpoint you are examining. Collections can be useful if you are specifically examining a single endpoint. Furthermore, they will be much faster than a network wide acquisition.
The Virtual Filesystem can be used to examine the files and directories of endpoints. If there is a single specific artifact you are trying to acquire or you prefer the file system view in DFIR, then this feature is preferred.
To use Velociraptor most effectively, a combination of these features should be used depending on which feature best suits each circumstance. After reading this blog, I hope you have come away with an understanding of how powerful of a tool Velociraptor can be for DFIR. Since this tool is free and open source, it is a great option for organizations with a limited budget for cybersecurity.
Authored by: Mitchell Biagini

Frequently asked questions
Still have questions?
Can’t find the answer you’re looking for? Please chat with our friendly team.